

How to build a Simple Video Chat Application using React JS
Understanding how WebRTC and Sockets work together


Introduction
In recent times, with lockdowns and restrictions on traveling due to covid, we have seen a rise in virtual forms of communication between people via zoom calls and other means. As a developer, it is crucial to understand how the connection to stream data between devices is being made in some of these web apps. Most real-time applications use Web Sockets to transfer data between client and server. Hence, we should first start by understanding how Web Sockets work.
P.S - Stick to the end of the blog for some bonus content
Why Web Sockets?
Web Sockets provide a way of connecting two nodes on a network to communicate with each other. One node listens on a particular port at an IP, while the other node reaches out to the other node to form a connection. The listener node(socket) forms the server while the client reaches out to this server. Unlike the HTTP protocol, where the client needs to send a request to the server and wait for the server to acknowledge the request and send back a response, sockets usually use the TCP/IP or UDP protocol for the transfer of data.
In the TCP/IP protocol, once the handshake is made between the client and server, the two nodes can seamlessly transfer data without having to send a request first and then wait for the response. This is very useful in real-time applications used for chatting, video-calling, etc.
Usually in real-time applications using socket connections, the peers(clients) who need to communicate will connect to a server using the TCP/IP protocol and the server will relay the messages between the clients. However, with WebRTC, we can establish a direct connection between the clients(web browsers) which can send data back and forth amongst themselves without having to pass the data through the server. This makes the transfer of data super fast.
What is WebRTC?
WebRTC is both an HTML5 specification and an open-source project released and maintained by Google. WebRTC stands for Web Real-Time Communications. It is at the intersection between the internet and telecommunications.
WebRTC’s main driver is bringing real-time communications into the browser, and to the hands of many more developers – enabling a considerable reduction in the barrier of entry for those who need to add communication capabilities to their applications, and a reduction in the level of friction end-users face when dealing with communication services. It enables sending voice, video, and any arbitrary data across browsers in a peer to peer fashion.
However, setting up a WebRTC connection between clients directly could be a little tricky. To make this process even more simple, we make use of a Socket.IO library.
What is Socket IO?
Socket.IO is a JavaScript library for real-time web applications. It enables real-time, bi-directional communication between web clients and servers. It has two parts: a client-side library that runs in the browser, and a server-side library for Node.js. Both components have a nearly identical API.
Making a Video connection between two clients
Now we will use all of the above technologies to establish a connection between two clients to enable video calling.
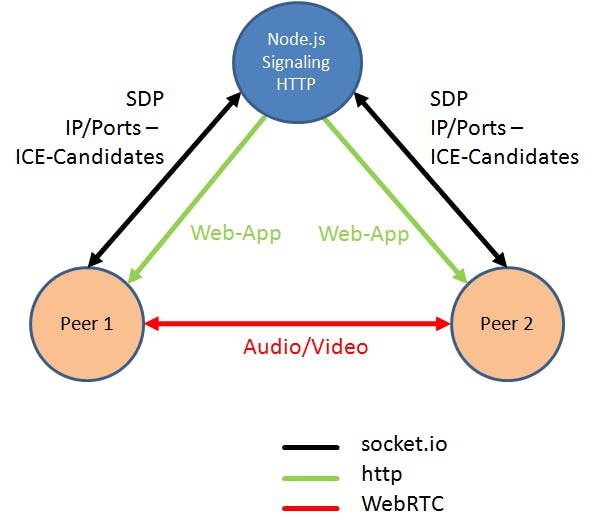
As you can see in the image above, first we need to set up a socket connection between the different peers and the server to access the signal data of the peers. Once the socket connection is made, we can enable direct communication between the connected peers using the simple-peer package, which is a concise node.js style API for WebRTC, to establish a direct connection.
This is the basic gist of how we can set up video connections using web sockets and WebRTC. Now, let us dive into the code to set up this connection
Socket IO server setup
const app = require("express")(); //initialize an express app
/*
    if you are not familiar with this syntax it is the same as:
    const express = require("express");
    const app = express();
*/
const server = require("http").createServer(app); //create the server
const cors = require("cors"); //for cross origin requests

const io = require("socket.io")(server, {
        cors: {
            origin: "*",
            methods: ["GET", "POST"]
        }
});
//initializing the socket.io server with cors setup to make requests to the server from any (domain, url or port)

app.use(cors());

const PORT = process.env.PORT || 5000;

app.get("/", (req, res) => {
    res.send("Server is running properly");
})

{/* Socket functions for signaling once the connection is made */}

server.listen(PORT, () => {
    console.log(`Server is listening on port ${PORT}`);
}); //we need to specify a port on which the server listens for requests
Socket signaling functions
We define some functions which listen to and emit signals that we use to set up the direct connection between the clients. These functions can be embedded in the commented code in the above code snippet.
io.on("connection", (socket) => { //This is a realtime listener listening for a connection from the client
    socket.emit("me", socket.id);//Once the connection is established it will emit the id associated with the connection

    socket.on("calluser", ({ userToCall, signalData, from, name}) => {
        io.to(userToCall).emit("calluser", {signal: signalData, from, name});
    });

    socket.on("answercall", (data) => {
        io.to(data.to).emit("callaccepted", {signal: data.signal});
    })
})
In the functions above, socket.on is a listener which listens to functions emitted on the client-side code, whereas, the .emit functions are used to emit the signal and data which is used on the client-side inside the listeners defined there.
Socket IO Client setup
Now we need to establish a connection with the Socket IO server we created from the client, on the frontend.
import {io} from "socket.io-client";

const socket = io("url_where_we_have_hosted_the_server");
//This will establish a connection between the client and the server that we
//have created

//On establishing the connection the socket will emit the unique id associated
//with the connection between the client and the socketio server.
socket.on("me", (id) => {
        //set the id
});//This is a listener on the function that emits the unique id when the connection is made.
//We can use this id in the future.
Accessing Client Media for Video Calling
navigator.mediaDevices
                .getUserMedia({ video: true, audio: true})
                .then((currentStream) => {
                    //set the stream
                    //we can also create a reference to this stream so it can directly be
                    // used inside a component using the useRef hook
                });
In this way, we can access the media(audio/video) of the user(client).
Now we need to intertwine Socket IO and Simple Peer functions to set up a direct connection between the clients
//creating a callUser function to enable calling another user using the users
//unique socketio connection id

const callUser = (id) => {
    const peer = new Peer({
            initiator: true,
            trickle: false,
            stream: stream //this is the current users stream
    });

    peer.on("signal", (data) => {
        socket.emit("calluser", {
            userToCall: id,
            signalData: data,
            from: //myId,
            name: //myName
        })
    });

    peer.on("stream", (stream) => {
        //other users stream can be stored to be displayed.
    });

    socket.on("callaccepted", ({ signal }) => {
      peer.signal(signal);
    });

    connectionRef.current = peer; //set the current peer connection
};

//answerCall function to accept an incoming peers call.
const answerCall = () => {
    const peer = new Peer({
      initiator: false,
      trickle: false,
      stream: stream,
    });

    peer.on("signal", (data) => {
      socket.emit("answercall", { signal: data, to: caller });
    });

    peer.on("stream", (stream) => {
      userVideo.current.srcObject = stream;
    });

    peer.signal(callerSignal);
    connectionRef.current = peer;
  };

//leaveCall function to destroy the peer-to-peer connection
const leaveCall = () => {
    connectionRef.current.destroy();
  };
Conclusion
In this way, we can easily establish a peer-to-peer connection for video calling. The above code and functions can be implemented with different Javascript frameworks to create a proper Web App like Zoom. I have created a Simple Video Chat application using React JS, Socket IO, and simple-peer WebRTC API. You can check out the Github repo here to understand the implementation and to check out some bonus features that I have implemented.